
| 일 | 월 | 화 | 수 | 목 | 금 | 토 |
|---|---|---|---|---|---|---|
| 1 | 2 | 3 | 4 | |||
| 5 | 6 | 7 | 8 | 9 | 10 | 11 |
| 12 | 13 | 14 | 15 | 16 | 17 | 18 |
| 19 | 20 | 21 | 22 | 23 | 24 | 25 |
| 26 | 27 | 28 | 29 | 30 |
- rev
- 파이썬
- Calling Convention
- x32
- pe format
- 프로그래머스
- Image dos header
- 크랙미
- __stdcall
- Rich Header
- __cdecl
- 리버싱
- 코드엔진
- Reversing
- 32bit
- 실행파일
- Python
- stack frame
- Dos Stub
- 리치헤더
- __vectorcall
- x64
- Programmers
- image section header
- ABI
- RVA
- 함수 호출 규약
- crackme
- __fastcall
- CodeEngn
- Today
- Total
kj0on
[Python] Decode Rich Header (CLI) 본문
1. 프로젝트 설명
이 프로젝트는 PE 파일의 Rich Header를 추출하고 복호화하여 컴파일 정보(제품 식별자, 빌드 번호, 빌드 프로세스 중 사용 횟수)를 분석하는 도구로 PE 파일을 4바이트 단위로 분할한 뒤 "Rich" 문자열과 xor Key를 찾아 암호화된 메타데이터를 해제하고 복호화된 Rich Header의 내용을 파일형태로 저장한다.
Rich Header (https://kj0on.tistory.com/25)
2. 실행
3. 코드
def read_chunks(filepath):
    with open(filepath, 'rb') as f:
        data = f.read()
    return [data[i:i+4] for i in range(0, len(data), 4)]

def find_rich_and_key(chunks, rich_tag):
    for i, chunk in enumerate(chunks):
        if chunk == rich_tag:
            return i, i + 1 # rich idx, key idx
    raise ValueError("Rich tag not found")

def decode_chunks(chunks, rich_idx, key, dans_tag):
    key = int.from_bytes(key, 'little')
    dans = int.from_bytes(dans_tag, 'little')
    result = []

    for d in reversed(chunks[:rich_idx]):
        val = int.from_bytes(d, 'little') ^ key
        result.append(val.to_bytes(4, 'little'))
        if val == dans:
            break

    result.reverse()
    result.extend([chunks[rich_idx], chunks[rich_idx+1]])
    print(result)
    return result

def write_chunks(decoded, savepath):
    with open(savepath, 'wb') as f:
        for chunk in decoded:
            f.write(chunk)

def write_parse_chunks(decoded_chunks, savepath):
    parse_chunks = decoded_chunks[:4] + [decoded_chunks[i] + decoded_chunks[i + 1] for i in range(4, len(decoded_chunks) - 6, 2)] + decoded_chunks[-2:]
    with open(savepath + ".txt", 'w') as f:
        for i, d in enumerate(parse_chunks):
            if len(d) == 4:
                line = f"{i:02d} : 0x{d.hex()} {d}"
            else:
                build_id = int.from_bytes(d[:2], 'little')
                product_id = int.from_bytes(d[2:4], 'little')
                count = int.from_bytes(d[4:8], 'little')
                line = f"{i:02d} : 0x{d.hex()} {d}\t{build_id}.{product_id}.{count}"

            f.write(line + '\n')
            print(line)

filepath = "Rich_Header"
savepath = filepath + "(Decoded)"
rich_tag = bytes.fromhex("52696368")  # Rich
dans_tag = bytes.fromhex("44616E53")  # DanS

chunks = read_chunks(filepath)
rich_idx, key_idx = find_rich_and_key(chunks, rich_tag)
key = chunks[key_idx]

decoded_chunks = decode_chunks(chunks, rich_idx, key, dans_tag)

write_chunks(decoded_chunks, savepath)
write_parse_chunks(decoded_chunks, savepath)
4. 함수
4-1. read_chunks
def read_chunks(filepath):
    with open(filepath, 'rb') as f:
        data = f.read()
    return [data[i:i+4] for i in range(0, len(data), 4)]
파일 경로의 바이너리 파일을 열어 전체 데이터를 읽고 이를 4byte 단위로 나누어 리스트 형태로 반환한다. 해당 리스트는 이후 디코딩과 분석에 사용된다. xor Key가 32bit이기 때문에 복호화 할때 평문 xor을 고려해 4byte 단위로 나눈다.
4-2. find_rich_and_key
def find_rich_and_key(chunks, rich_tag):
    for i, chunk in enumerate(chunks):
        if chunk == rich_tag:
            return i, i + 1 # rich idx, key idx
    raise ValueError("Rich tag not found")
4byte 단위의 청크 리스트에서 "Rich" 태그가 위치한 인덱스를 찾고 해당 위치의 다음 인덱스를 암호화 키가 위치한 곳으로 간주하여 두 위치를 반환한다. 만약 "Rich" 문자열이 발견되지 않으면 예외를 발생시킨다.
4-3. decode_chunks
def decode_chunks(chunks, rich_idx, key, dans_tag):
    key = int.from_bytes(key, 'little')
    dans = int.from_bytes(dans_tag, 'little')
    result = []

    for d in reversed(chunks[:rich_idx]):
        val = int.from_bytes(d, 'little') ^ key
        result.append(val.to_bytes(4, 'little'))
        if val == dans:
            break

    result.reverse()
    result.extend([chunks[rich_idx], chunks[rich_idx+1]])
    print(result)
    return result
"Rich" 태그 이전의 청크들을 "Rich" 태그 이전부터 역순으로 디코딩하는 작업을 수행한다. 주어진 키를 리틀 엔디언으로 정수 변환한 후 각 청크에 XOR 연산을 적용하여 복호화하며 디코딩 중 "DanS" 태그에 도달하면 멈추고 디코딩 결과를 4byte 단위 정방향으로 다시 정렬한 뒤 Rich와 키 청크를 끝에 추가하여 반환한다. 이때 각 블록의 리틀 엔디언은 유지한다.
4-4. write_chunks
def write_chunks(decoded, savepath):
    with open(savepath, 'wb') as f:
        for chunk in decoded:
            f.write(chunk)
복호화된 청크 리스트를 지정된 경로의 바이너리 파일로 저장한다.
4-5. write_parse_chunks
def write_parse_chunks(decoded_chunks, savepath):
parse_chunks = decoded_chunks[:4] + [decoded_chunks[i] + decoded_chunks[i + 1] for i in range(4, len(decoded_chunks) - 6, 2)] + decoded_chunks[-2:]
with open(savepath + ".txt", 'w') as f:
for i, d in enumerate(parse_chunks):
if len(d) == 4:
line = f"{i:02d} : 0x{d.hex()} {d}"
else:
build_id = int.from_bytes(d[:2], 'little')
product_id = int.from_bytes(d[2:4], 'little')
count = int.from_bytes(d[4:8], 'little')
line = f"{i:02d} : 0x{d.hex()} {d}\t{build_id}.{product_id}.{count}"
f.write(line + '\n')
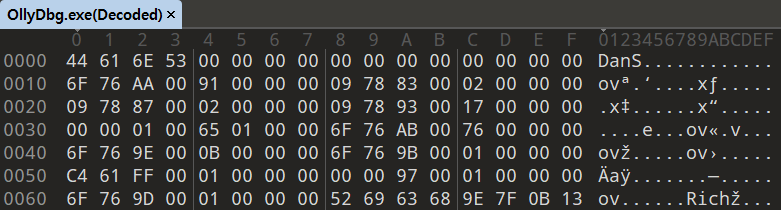
print(line)디코딩된 청크 데이터를 사람이 읽을 수 있는 형식으로 분석하여 텍스트 파일로 저장한다. 첫 4개 청크("DanS" 태그, 0 패딩)는 개별적으로 출력하고 중간의 청크(build number, product identifier, dwCount)들은 8바이트 단위로 묶어 각각의 멤버를 '.' 으로 구분한다. 마지막 두 청크("Rich" 태그, xor Key)는 그대로 출력하여 분석 결과를 직관적으로 제공한다.
5. 동작 및 사용법
filepath = "Rich_Header"
savepath = filepath + "(Decoded)"
rich_tag = bytes.fromhex("52696368")  # Rich
dans_tag = bytes.fromhex("44616E53")  # DanS

chunks = read_chunks(filepath)
rich_idx, key_idx = find_rich_and_key(chunks, rich_tag)
key = chunks[key_idx]

decoded_chunks = decode_chunks(chunks, rich_idx, key, dans_tag)

write_chunks(decoded_chunks, savepath)
write_parse_chunks(decoded_chunks, savepath)
파일을 4바이트 단위로 분할한 뒤, "Rich" 태그의 위치와 그 다음에 있는 xor Key를 찾아내고 "Rich" 태그 이전의 데이터를 키를 이용해 복호화하며 "DanS" 태그를 기준으로 복호화를 종료한다. 복호화된 결과는 바이너리 파일로 저장되며 이후 사람이 읽을 수 있는 형식의 텍스트 파일도 저장된다.
filepath = "Rich_Header"파일의 경로를 지정한다. PE 파일, "Rich" 태그가 포함된 바이너리 파일을 대상으로 사용할 수 있다.
6. 실행 결과
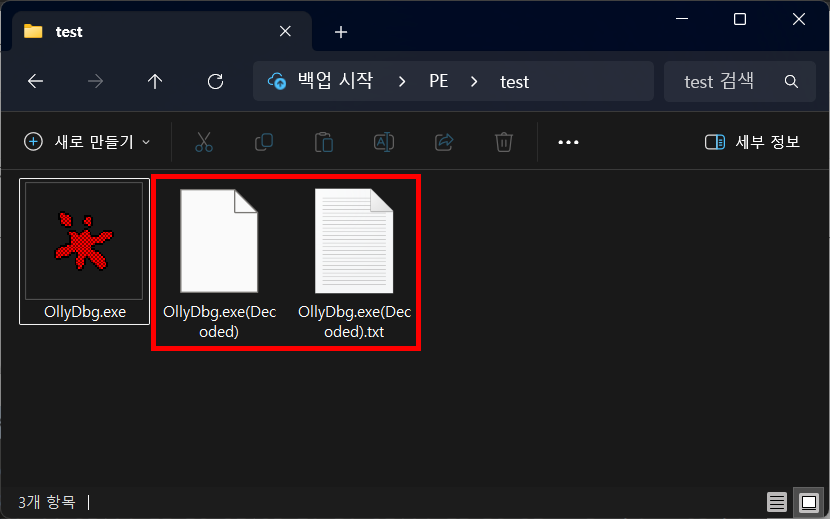
코드를 실행하면 2개의 파일이 생성된다.
파일에서 Rich Header의 부분만 복호화 되어 나타난다.

복호화 바이너리 값을 통해 컴파일 정보(제품 식별자, 빌드 번호, 빌드 프로세스 중 사용 횟수)를 출력한다.
6-1. Binary
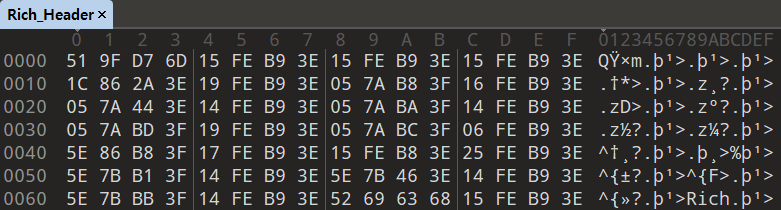
PE 파일에서 Rich Header에 해당하는 부분만 추출해 바이너리로 저장한 파일이다.
6-2. PE

Window 운영체제 내에서 실행 가능한 파일인 PE File이다.
7. GitHub
https://github.com/kj0on/DecodeRichHeader
GitHub - kj0on/DecodeRichHeader: PE 파일의 Rich Header를 추출하고 복호화하여 컴파일 정보(제품 식별자, 빌
PE 파일의 Rich Header를 추출하고 복호화하여 컴파일 정보(제품 식별자, 빌드 번호, 빌드 프로세스 중 사용 횟수)를 분석하는 도구로 PE 파일을 4바이트 단위로 분할한 뒤 "Rich" 문자열과 XOR 키를 찾
github.com
'Project > Toy' 카테고리의 다른 글
| [C/Python] x32 함수 호출 규약 성능 비교 (stdcall, cdecl, fastcall, vectorcall) (5) | 2025.07.31 |
|---|